You have a unique, amazing design ready to sell on a t-shirt, but you’re unsure how to size it. Will it stand out? Will the image look crisp and professional? How big is too big?
We’ve been there, and we’ve helped thousands find the perfect size for their design. With years of experience and resources at our disposal, we’ve gathered the best tips and tricks to make sure your design sits on the tee just right!
Key Takeaways
- T-shirt design size is a key factor in achieving the best printing results—if designs are oversized or placed too close to seams, the shirt may have press tolerance issues, image cropping, or a heavy hand-feel.
- For a professional appearance, always center front designs, place them two to three inches below the neckline, and maintain at least a one-inch gap from all seams.
- To ensure your artwork prints exactly as envisioned, export files at their actual printed dimensions with a minimum resolution of 300 DPI and a transparent background.
Why T-Shirt Design Size Matters
Carefully considering the size and placement of your designs ensures the final t-shirt looks balanced and professional. This can positively influence first impressions and brand credibility, especially for first-time customers.
Design size can also affect how the t-shirt feels on the wearer, shaping their perception of the garment. For example, oversized designs may have a heavier hand-feel, which can affect breathability and make the garment less comfortable to wear.
How Design Size Impacts Print Method
At Bonfire, we have multiple printing methods available to ensure the best print for your design. When choosing the print method, we carefully consider factors like the number of shirts sold in a batch, design elements, and whether the design is full-color. Here are the methods we use:

- Direct-to-Garment (DTG) is a digital printing process using water-based inks. The design is printed directly onto the shirt and attaches to the garment’s fabric. This method is great for highly detailed and full-color prints.
- Screen Printing is typically the go-to for larger batches of shirts. The design is transferred to a surface via stencil using ink and a mesh screen. This method can make shirts feel heavier and less breathable, making it less ideal for larger-sized designs.
- Direct-to-Film (DTF) is similar to DTG. However, instead of being printed directly onto a garment, the ink is printed on a thin piece of film. Like screen printing, this can have a heavier hand feel and isn’t ideal for larger-sized or all-over designs.
With Bonfire, most prints can be printed up to 15 by 18 inches. Keep in mind that exceeding the printable area can cause prints to be cropped and/or images to be blurry.
Keeping Your T-Shirt Design Size in the Printing Safe Zone
To help you size your design perfectly, find a tool or resource that guides the placement and size of your logo.
The Bonfire Design Tool allows you to upload and place your design on the shirt you’d like to order, so you can see exactly what it will look like. Our tool also helps you center your design and marks the printable area, so you never have to worry if your design is out of bounds.
If your design has more than eight colors, our Design Tool will give you the option to optimize the design by reducing the number of colors, which will also optimize your profits. If you’d like a full-color design, you can select the original design to proceed with the full-color. When uploading your design, ensure your file is high quality and at least 300 dots per inch (DPI) to avoid low-resolution or blurry prints. If the design has a transparent background, choose .png as the file type.
Additionally, the size of the t-shirt will impact print size. Below are our recommended print dimensions for each shirt size:
| T-Shirt Size | Print Size |
|---|---|
| S-M | 9-10” |
| L-XL | 10-11” |
| XXL | 11-12” |
| XXXL+ | 12-13” |
T-shirt Design Size Chart and Placement
Comprehensive sizing charts eliminate guesswork and provide consistent starting points for any design project. This reference covers adult and youth dimensions with standard placement distances.
| Placement | Adult Size | Youth Size | Distance from Collar | Notes |
|---|---|---|---|---|
| Left chest | 3–4 in wide | 2.5–3 in wide | 3–4 in from collar | Square or horizontal logos |
| Center chest | 6–10 in wide × 6–8 in tall | 5–7 in wide × 5–6 in tall | 2–3 in below seam | Most versatile placement |
| Full front | 10–12 in wide × 10–14 in tall | 8–10 in wide × 9–12 in tall | 2–3 in below seam | Maximum impact designs |
| Upper back | 10–12 in wide × 5–7 in tall | 8–10 in wide × 4–6 in tall | 3–4 in below seam | Professional placement |
| Full back | 12 in wide × 14–16 in tall | 8–10 in wide × 10–12 in tall | 3–4 in below seam | Large graphics/text |
| Sleeve | 2–3 in wide | 1.5–2 in wide | Center between seam/hem | Short sleeve only |
| Pocket area | 2.5–3 in wide | 2–2.5 in wide | Center on pocket | Real or faux pocket |
Front of Shirt Design Size and Placement
Front placement options serve different design purposes and audience expectations:
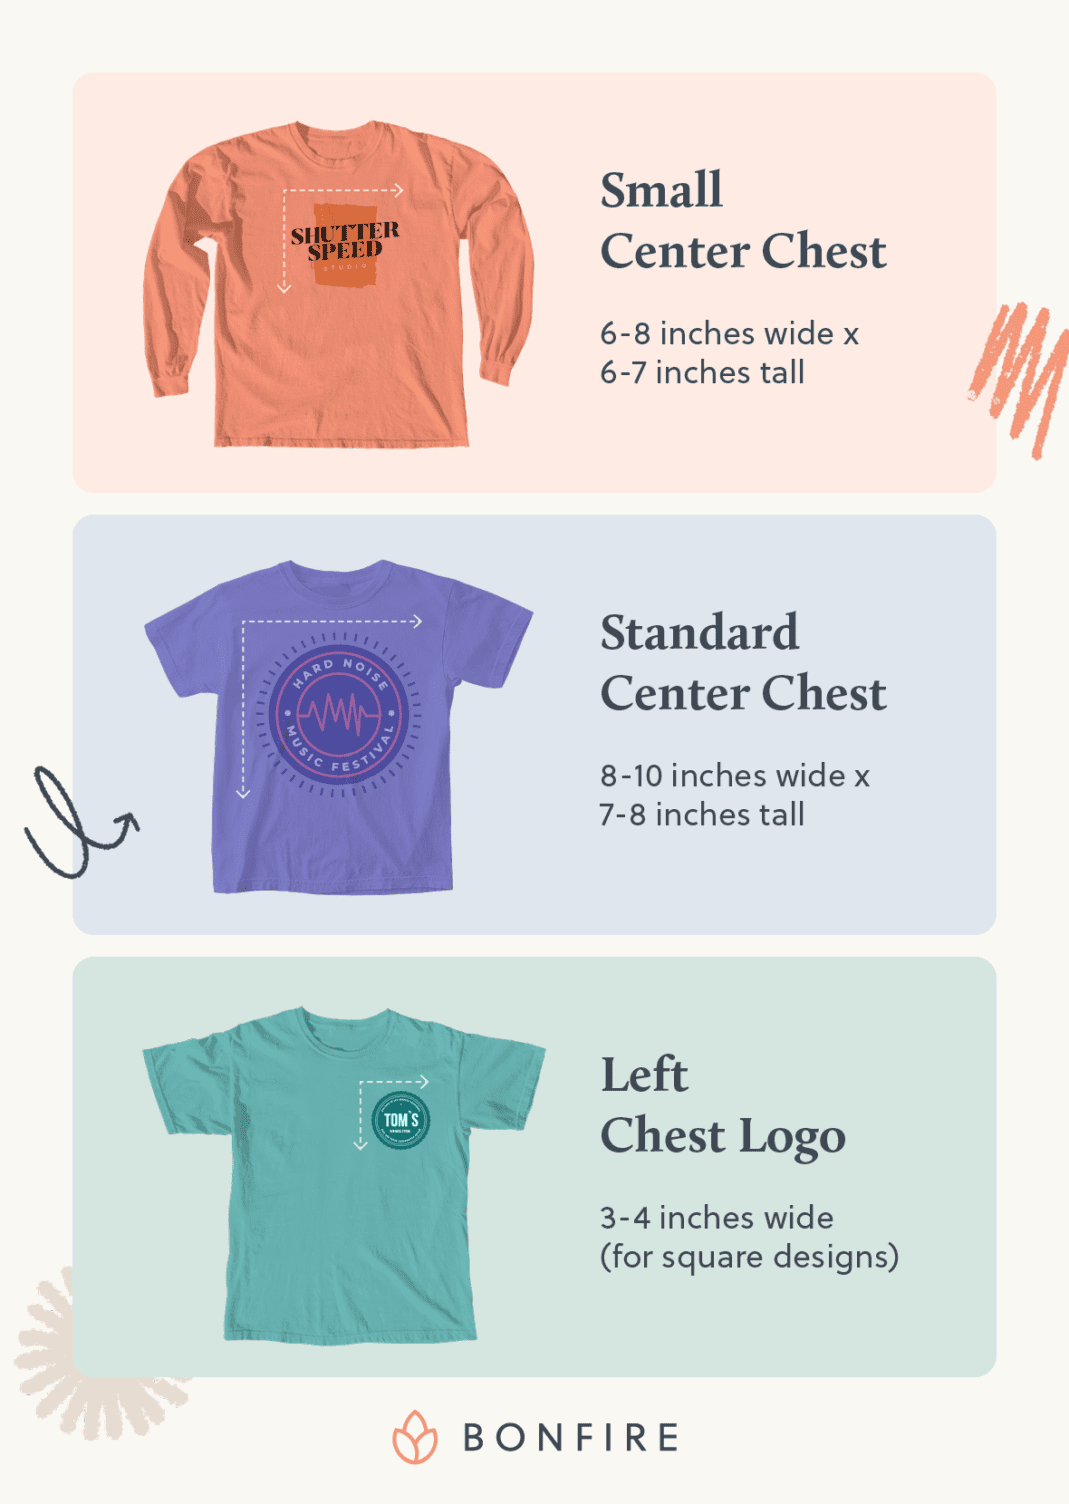
- Small center chest: 6-8 inches wide x 6-7 inches tall for subtle logos or minimalist text. This sizing works well for professional or understated branding.
- Standard center chest: 8-10 inches wide x 7-8 inches tall for most designs. This range accommodates detailed graphics while maintaining readability and visual impact.
- Left chest logo (pocket area): 3-4 inches wide for square or horizontal lockups. Industry standards recommend keeping logos compact in this high-visibility area.
Placement distances also ensure professional appearance:
- Crew neck: Place 2-3 inches below the collar seam, centered.
- V-neck: Place 1-2 inches below the V point, centered.
Proportional sizing maintains design balance across garment sizes. Set the width to 60-70% of the garment chest width for center-chest placements, then adjust based on actual garment measurements. Respect print area limits and seam allowances by keeping at least 1 inch from all seams. This spacing prevents press issues and creates polished results.
Full Front Shirt Design Size and Placement
Full front designs maximize visual impact while respecting garment proportions and wearability.
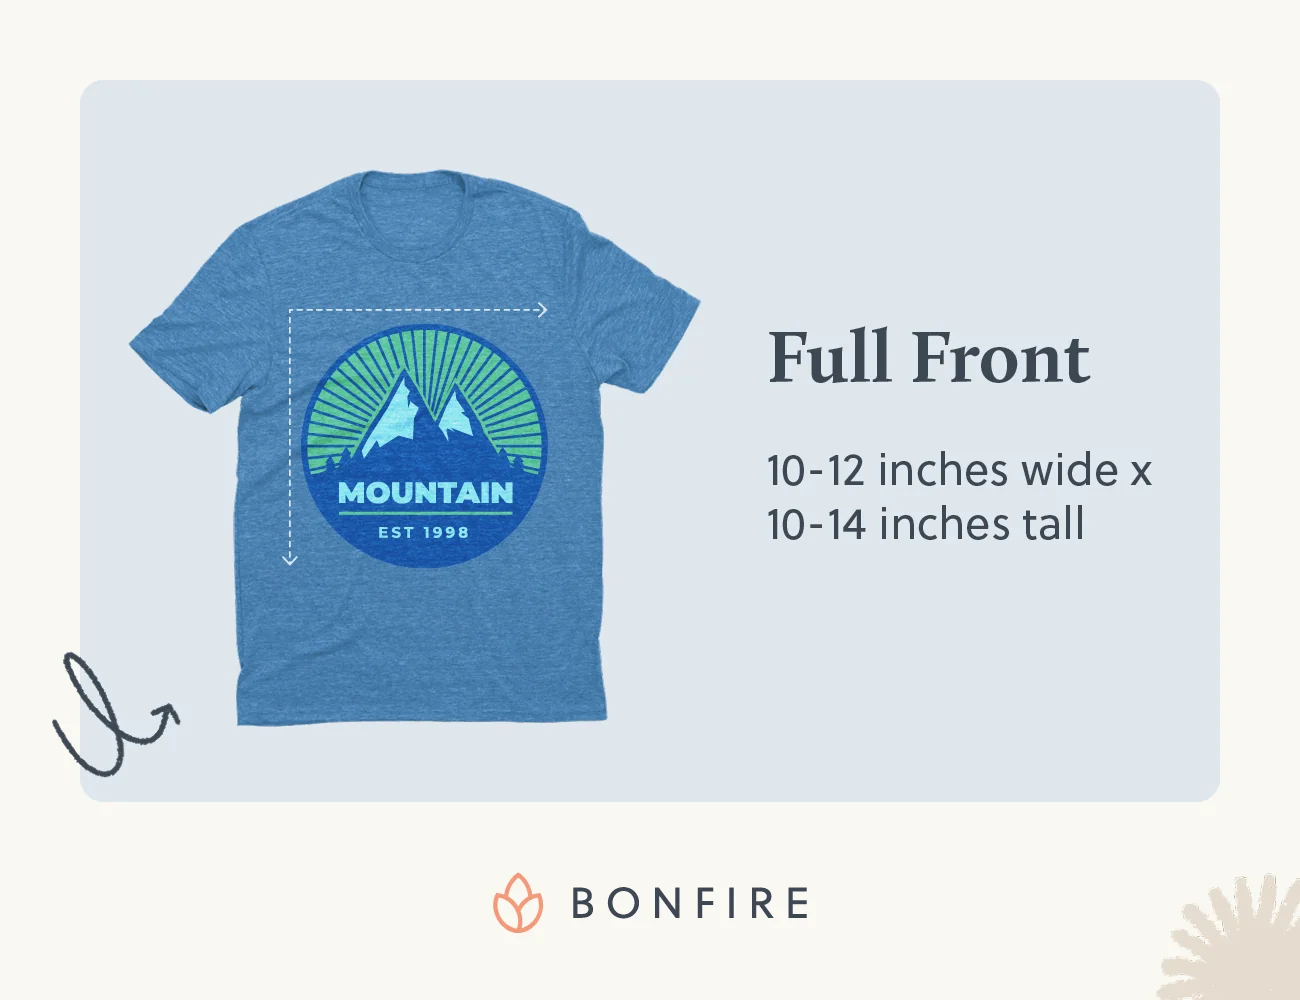
- Full front dimensions (adult): 10-12 inches wide x 10-14 inches tall. This sizing balances readability with comfort, preventing designs from overwhelming the wearer or extending into problem areas.
- Edge spacing requirements: Maintain at least 1 inch from side seams, hem, and collar seam. Proper spacing prevents a cramped appearance and press tolerance issues.
Scaling considerations:
- Scale up on roomy, boxy, or oversized tees for a streetwear aesthetic while respecting maximum print areas.
- Scale down on slimmer fits to prevent designs from wrapping under arms or extending onto the abdomen.
The proportional rule applies: Aim for 70% of chest width for full fronts, then refine through mockup testing. Remember that sizing debates exist because garment variations require flexible approaches.
Back of Shirt Design Size and Placement
Back designs offer expanded canvas space with specific placement considerations for optimal visual impact.
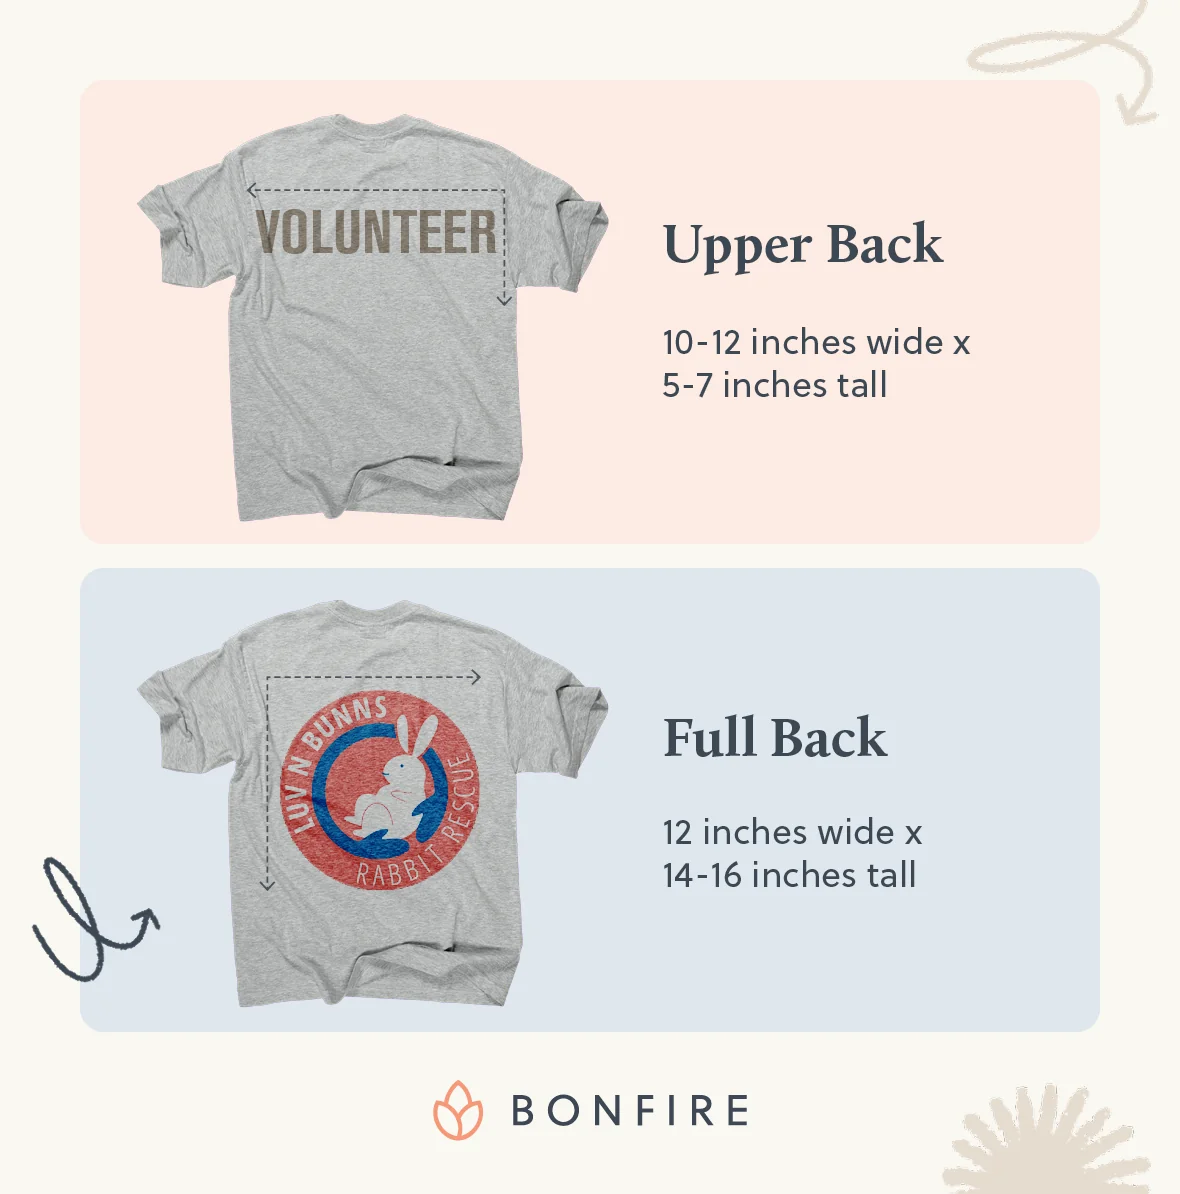
- Upper back (between shoulder blades): 10-12 inches wide x 5-7 inches tall, positioned 3-4 inches below the collar. This placement creates a professional appearance without interfering with collar or shoulder movement.
- Full back: 12 inches wide x 14-16 inches tall for comprehensive graphics or large text blocks. Maintain a 1-inch minimum from all seams for press tolerance and visual breathing room.
Back design sizing follows similar proportional principles as front designs while accommodating the larger available space.
Adjusting Design Size for Different Product Styles
As you determine your design’s best size, consider current trends and how it will look across varying styles and sizes. Offering an array of sizing options will broaden your reach.
Garments like hoodies and tanks have elements that can affect the design placement. Front designs should be raised 0.5” to clear hoodie pocket seams, and tank-top prints may need to be narrowed to avoid armhole distortion. In Bonfire’s Design Tool, our printable areas can help guide you when it comes to garments that may be a little more difficult to place a design on. Our goal is to make the process as simple as possible, and our team is always here to help!
How to Prepare Your T-Shirt Design Files
High-quality files result in crisp, color-accurate prints. Follow these steps to prepare your files for printing:
- Achieve the ideal pixel dimensions and DPI. We recommend 4500×5400 pixels at 300 DPI for full-fronts (larger designs) and 1200×1200 pixels for pocket prints (smaller designs). The higher the DPI, the sharper the printed image.
- Adjust file type for color and transparency. To ensure your file is optimized for printing, it should be .ai, .png, .jpg, .pdf, or .eps. For any transparent elements, a .png will be the best choice for your design file.
- Test with a preview tool. To avoid any faded appearances, we suggest making sure there are no semi-transparent pixels. You can view and inspect your design using our Design Tool, where you can upload your art, toggle shirt colors, and zoom to 100% to take a close look at edges.
Common T-Shirt Design Placement Mistakes to Avoid
If it’s your first time designing a t-shirt, you may make some mistakes along the way. However, being aware of common missteps can help you avoid them. The five most common design placement mistakes include:
- Collar crowding: Designs too close to the neckline look off-balance. Maintain 2 to 3 inches on crew necks for a professional appearance.
- Edge-to-edge designs: Leave a minimum of 1 inch from seams for press tolerance and polished results.
- Resolution problems: Avoid upscaling images. Export final size at 300 DPI for crisp results.
- Fit ignorance: Perfect width on boxy tees can overwhelm fitted styles. Mock up each garment type individually to confirm that the design fits on the garment.
- Universal sizing: Start with charts, finish with proportional scaling and mockup verification.
To avoid common placement mistakes, partner with a company like Bonfire. Our Design Tool will help you place your graphic perfectly on a tee without needing a ruler. Our team will then print your design with precision to match the placement you’ve selected.
Wrapping Up
The size and placement of your t-shirt design have a significant impact on the final product. Following these tips and best practices ensures your custom apparel looks polished and professional once printed, instilling trust in your organization. However, the most important first step is to choose a reputable printing partner that will help you every step of the way, like Bonfire.
To learn more about our offerings and gain tips on how to craft your own custom merchandise, check out these additional resources:
- From Concept to Cash: How to Create Your Own Merchandise. Learn everything you need to know about creating and selling your own merch in this step-by-step guide.
- 17 Fundraising Products You Should Be Selling in 2026. Explore the top trending products that fundraisers are selling to rally support this year.
- 8 T-Shirt Fundraising Ideas That Work for Any Cause. Thinking about launching a fundraiser for your cause? Discover these creative t-shirt fundraising ideas.
T-Shirt Design Size FAQs
What is the maximum art size Bonfire can print?
The maximum art size is 11.5 inches wide by 14 inches long, or 11.5 inches by 11.5 inches on Pullover Hoodies.
What shirt size is shown in Bonfire’s design tool?
All shirts shown in the design tool are size Large. Using a size Large keeps the proportions consistent, so artwork can be viewed and compared accurately during the design process and on Campaign pages.
How big should a design be on a 3XL or larger shirt?
For a design on a 3XL or larger shirt, you’ll want to aim for the print to be 12–13 inches wide and start 3 inches below the collar. This ensures the graphic remains proportionate on extended sizes.
Do I need separate files for front and back prints?
Yes—upload individual PNGs for each location to keep resolution high and placement flexible.

Joe is the Director of Growth Marketing at Bonfire and has over 8 years of experience in the custom merchandise and apparel fundraising space. His favorite shirt color is Kelly Green, and he prefers hoodies over crewneck sweatshirts.